Easter Bunny Painting Egg Shadow Box: A Layered Paper Art Project That Brings Spring to Life
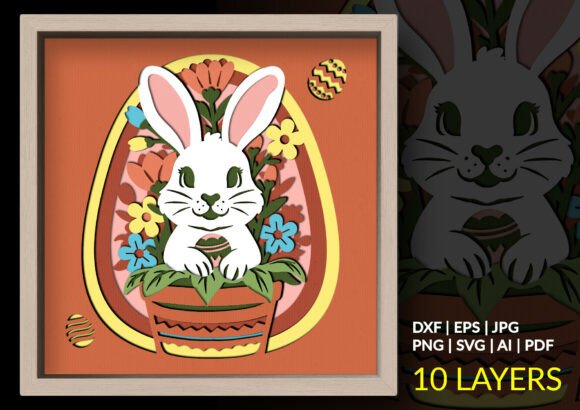
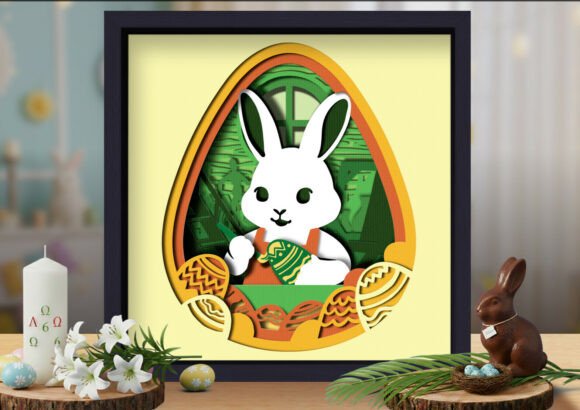
Some crafts sit on a shelf and quietly blend into the background. Others pull your eye across the room and make you pause. The Easter Bunny Painting Egg Shadow Box falls firmly into the second category. It is a multi-layer papercut design that stacks sixteen individual sheets to create a three-dimensional scene inside an egg-shaped frame. At the center, a bunny artist leans over a decorated egg, holding a paintbrush like it is mid-stroke. Every layer adds more shadow, more depth, and more reason to lean in closer.
What makes this particular design stand out is not just the layer count, though sixteen layers certainly deliver a professional-grade 3D effect. It is the storytelling inside the silhouette. This is not a generic bunny outline or a simple floral motif. It is a moment frozen in time — a cheerful rabbit absorbed in the act of painting, surrounded by spring details that echo the season. For crafters who want their shadow boxes to feel like tiny narrative worlds, this file delivers exactly that.
What Exactly Is This Shadow Box Design?
In practical terms, the Easter Bunny Painting Egg Shadow Box is a digital download containing vector files formatted for cutting machines and manual crafting. You receive SVG, DXF, EPS, AI, PNG, and PDF formats. Each format speaks to a different workflow. The SVG file integrates directly with Cricut Design Space and Silhouette Studio Designer Edition. The DXF option opens in the free version of Silhouette Studio. The EPS and AI files give Adobe Illustrator and Inkscape users full editing control over every node and curve. A high-resolution PNG with transparent background lets you preview the artwork or use it in other digital projects, and the PDF serves as a printed reference or manual assembly guide.
The design itself is organized into sixteen distinct layers. When cut from cardstock — typically in shades of white, cream, soft pastels, or whatever palette suits your spring decor — these layers stack with foam adhesive spacers between them. The spacers create physical distance, which turns flat paper into a dimensional scene where shadows fall naturally and details emerge at different depths. The egg shape acts as a natural framing device, so the finished piece feels self-contained and display-ready without needing a separate frame.
Where People Actually Use This Design
Most people first picture this shadow box sitting on a mantel or a sideboard during Easter season, and that is absolutely one of its strongest uses. But after talking with crafters who work with layered designs regularly, the applications spread much wider than holiday shelf decor.
Seasonal Home Decor That Starts Conversations
Placed on an entryway console table, this shadow box greets guests the moment they walk through the door. It signals that your home celebrates the season in a thoughtful, handcrafted way. Because the egg silhouette reads clearly from several feet away, it catches attention even before someone notices the fine details inside. Move closer, and the bunny painting scene rewards curiosity. This combination of bold outer shape and intricate inner detail makes it effective at both distance and up close — something mass-produced seasonal decor rarely achieves.
Meaningful Handmade Gifting
A finished shadow box like this one makes a memorable Easter gift precisely because it cannot be bought off a store shelf. Grandparents receive it as a keepsake that nods to spring traditions. Children light up at the playful bunny character. Friends who appreciate handmade home accents understand the hours and skill poured into each layer. Because the design is neutral enough to display beyond Easter — especially in softer pastel or neutral color schemes — recipients do not feel pressured to pack it away the moment the holiday passes.
Spring Craft Fair and Market Inventory
Small business owners who sell at spring markets and craft fairs find layered shadow boxes to be strong performers. The visual impact stops shoppers mid-aisle. The perceived value supports pricing that reflects the labor involved. An Easter Bunny Painting Egg Shadow Box displayed on a table easel, perhaps with a small LED tea light behind it to emphasize the depth, becomes an impulse purchase for customers who came looking for seasonal touches. Several crafters have mentioned that spring-themed shadow boxes outsell generic home decor items during March and April events simply because the seasonal relevance creates urgency to buy.
Advanced Crafting Skill Development
For makers who have mastered simpler three- or five-layer designs and want to push their capabilities, a sixteen-layer project marks a meaningful step up. The layer count demands patience and precision. Alignment becomes critical when working with this many stacked sheets. Each layer must be cut cleanly, assembled squarely, and spaced consistently. Completing a project of this complexity builds confidence and teaches practical skills that transfer to other advanced papercraft, cardstock engineering, and even laser-cut wood projects.
Educational and Therapeutic Crafting Settings
Art teachers and occupational therapists sometimes incorporate layered paper projects into their sessions for reasons beyond the finished product. The process of cutting, sorting, and stacking layers exercises fine motor control and sequential thinking. The predictable, methodical assembly can be calming for individuals who benefit from structured, hands-on activities. An egg-shaped design with a playful bunny theme feels approachable and cheerful in settings where the emotional tone matters as much as the skill-building outcome.
How Different Users Benefit in Different Ways
The same digital file serves dramatically different purposes depending on who downloads it. A Cricut hobbyist in a small apartment might cut the layers from affordable cardstock and assemble everything at her kitchen table over a weekend, producing a one-of-a-kind centerpiece that cost little more than paper and glue. A laser-cutting business owner might scale the design, cut it from Baltic birch plywood, and sell finished shadow boxes at a premium price point. A graphic designer might pull the vector artwork into a larger spring marketing campaign, repurposing elements for social media graphics or printable products. A retiree who enjoys intricate hand-cutting might print the PDF template, trace it onto specialty paper, and work through each layer with a craft knife as a peaceful daily practice. The file adapts to the user's tools, materials, skill level, and intentions.
Key Considerations Before You Start Cutting
Before downloading and loading this file into your cutting machine, a few practical considerations will save frustration and wasted materials.
Machine compatibility matters. While the SVG format works beautifully with Cricut and Silhouette machines, files with this many intricate layers can strain older or entry-level cutting machines. Thin, delicate cuts — like the bunny's whiskers or the fine patterns on the egg — require a sharp blade, proper settings, and possibly a machine capable of handling detailed vector paths without tearing the paper. If you are using a machine that has seen heavy use, consider starting with a fresh blade.
Paper choice affects the final look dramatically. The same design cut from plain white cardstock looks crisp and architectural. Cut from textured linen paper in soft pastels, it feels more organic and springlike. Metallic or pearlescent papers add shimmer that catches light differently at each layer depth. Heavier cardstock holds its shape better for display but may require multiple passes or adjusted cut settings. Lighter paper cuts more easily but can warp with adhesive or sag under its own weight in deeper layers.
Assembly requires patience and a steady hand. Sixteen layers mean fifteen sets of foam adhesive spacers, each needing consistent placement to keep the stack aligned. A slight misalignment on layer three becomes noticeable by layer ten. Working on a flat, well-lit surface with tweezers and a bone folder nearby makes the assembly process smoother. Many experienced crafters recommend assembling from the back layer forward, checking alignment after every two or three layers rather than waiting until the end.
Display conditions influence material choices. If the finished shadow box will sit in direct sunlight, paper colors may fade over time unless you use archival or UV-resistant materials. Displaying inside a shadow box frame with glass protection extends longevity significantly. For high-humidity environments like bathrooms or screened porches, consider whether sealed wood layers might hold up better than unsealed cardstock.
Why a Sixteen-Layer Design Creates a Different Kind of Impact
There is a noticeable jump in visual sophistication between a five-layer shadow box and a sixteen-layer one. New shadow box makers sometimes wonder if the extra layers are worth the additional cutting and assembly time. Once the piece is finished and displayed, the answer becomes obvious. Those additional layers do not simply add more of the same effect — they create graduated depth, subtle shadow transitions, and a sense of atmosphere that thinner designs cannot replicate. The bunny and the egg appear to exist inside a real space, not just in front of a flat background. Light moves through the layers differently as the sun shifts throughout the day, subtly changing the shadows and revealing new details.
For crafters selling finished pieces, this level of depth and detail commands a higher price point and attracts buyers who recognize the difference between a quick weekend craft and a carefully engineered paper art piece. For makers creating gifts, the sixteen-layer complexity communicates care and effort in a way that genuinely resonates with recipients. For anyone making something for their own home, the depth creates a piece worth displaying prominently rather than tucking onto an overcrowded shelf.
Practical Thoughts on Framing and Display
Because the design is already contained within an egg-shaped silhouette, you can display the finished piece with or without a traditional shadow box frame. Some crafters mount the layered stack onto a backing board, add a simple hanging cord to the back, and hang it directly on the wall as a dimensional art piece. Others slide the finished assembly into a deep shadow box frame for protection and a more polished gallery look. Small tabletop easels let the piece stand on a desk, mantel, or windowsill where it catches morning light. If you cut the design from translucent vellum or thin paper, placing a soft light source behind it creates a glowing lantern effect that transforms the piece entirely after dark.
Who This Design Is — and Is Not — For
This file targets crafters who already feel comfortable with their cutting machine and basic layered paper projects. Complete beginners may find sixteen layers overwhelming, especially if they are still learning about cut settings, blade depth, and material handling. However, motivated beginners who are willing to move slowly, possibly making test cuts of the most delicate layers first, can absolutely succeed. The design rewards careful work rather than speed.
For intermediate and advanced crafters, this project offers a satisfying challenge without being punishing. It is complex enough to stay engaging through the entire assembly process but not so intricate that it becomes frustrating. The result looks harder to achieve than it actually is, which is often the hallmark of a well-designed layered file.
Ultimately, the Easter Bunny Painting Egg Shadow Box fills a specific and valuable niche. It bridges the gap between simple seasonal crafts and serious paper art. It works as a personal project, a gift, or a product. It fits within a few weeks of spring decorating but holds enough charm and quality to deserve year-round display in the right setting. For makers looking to create something that feels genuinely special this Easter season, this design offers a clear path from cutting mat to finished keepsake.